Latest

Tally Course India - A Must For Students
Why You must Learn Tally in India 


Now, let's delve into how learning Tally can open doors to diverse and promising career opportunities across a range of industries in India:

1. Corporate Jobs:

Corporate finance departments are increasingly reliant on Tally for their day-to-day financial operations. Learning Tally is an excellent way to qualify for positions such as financial analysts, accountants, or finance managers in corporations. The software's ease of use and its widespread adoption in the corporate world make Tally skills a valuable asset for job seekers.

Join Certificate Course in Tally - Goa Institute

2. Small and Medium Enterprises (SMEs):

India's SME sector is vast, and these businesses need cost-effective solutions to manage their finances. Tally is an affordable and efficient choice for SMEs, making Tally-trained professionals highly sought after. Many SMEs seek accountants and finance professionals with Tally expertise.

3. Retail Industry:

In India, the retail sector is immense and continuously expanding. Managing inventory, sales, and finances are crucial in this industry. Tally simplifies these tasks, making it a preferred choice for retailers. Whether you work in a shopping mall, a standalone store, or an e-commerce platform, Tally proficiency is a significant advantage.

4. Healthcare Sector:

Hospitals and healthcare facilities need robust financial systems to manage their budgets and accounts. Tally's ability to handle financial complexities aligns perfectly with the healthcare sector's needs. Positions like hospital accountants or finance managers often require Tally skills.

5. Educational Institutions:

Schools and colleges also require efficient financial management. Tally can help educational institutions keep track of their expenses, fees, and budget. Learning Tally can lead to job opportunities as school accountants or financial administrators.

6. Hospitality Industry:

The hotel and restaurant business relies on meticulous financial management to ensure profitability. Tally's features, such as inventory management and financial reporting, are crucial for success in this sector. Tally skills can help your secure positions as hotel accountants or finance managers in the hospitality industry.

7. Service Sector:

The service industry, which includes businesses like IT services, consulting firms, and advertising agencies, requires careful financial planning and management. Tally offers a comprehensive suite of tools for managing financial transactions and generating reports. Professionals who can handle Tally are valuable assets in this sector.

8. Self-Employment and Proprietorship:

Apart from seeking employment, learning Tally can empower you to start your own accounting or bookkeeping business. You can offer services to small businesses or entrepreneurs looking for financial management solutions. Tally's affordability and user-friendliness make it an excellent choice for such ventures.


See the Tally Prime Course Syllabus here

Benefits of Learning Tally for Career Growth

Now that we've explored the industries where Tally skills are highly valued, let's delve into the specific benefits of learning Tally for your career growth:

1. High Demand for Tally Professionals:

The demand for Tally professionals is on the rise, given the software's extensive use in various industries. As a Tally-trained individual, you can enjoy a competitive edge in the job market.

2. Leverage for Career Advancement:

For those already working in finance or accounting, adding Tally skills to your resume can significantly enhance your career prospects. It can lead to promotions and higher-paying positions.

3. Lucrative Salaries:

Tally professionals often earn competitive salaries, particularly in sectors with high demand for their skills, such as corporate finance and retail management.

4. Entrepreneurial Opportunities:

Learning Tally provides you with the knowledge and tools to start your own accounting or bookkeeping business, offering services to businesses and entrepreneurs.

5. GST Compliance Expertise:

With the introduction of GST, businesses are constantly seeking professionals who understand the complexities of GST compliance. Tally-trained individuals are well-equipped to handle this aspect.

6. Skill Enhancement:

Tally courses not only teach you how to use the software but also enhance your accounting and financial management skills. This knowledge is transferable to other accounting software and tools.


See Also the Features of Tally You must Know

Choosing the Right Tally Course

Before you embark on your journey to learn Tally, it's important to choose the right course. Consider the following factors:

  • Course Type: Tally courses range from basic to advanced and can also include specialization in areas like GST compliance. Choose a course that aligns with your career goals.

  • Institute Reputation: Look for institutes with a strong reputation for providing quality Tally education.

  • Trainers' Qualifications: Instructors with industry experience and certifications can provide valuable insights and guidance.

  • Course Duration: Decide on the course duration that fits your schedule and learning pace.

  • Certification: Ensure that the course offers certification upon

SYLLABUS OF LATEST SOFTWARE TALLY PRIME


TallyPrime Course Syllabus Goa with Details

INTRODUCTION TO TALLY PRIME

  • INTRODUCTION TO TALLY PRIME
  • FEATURES OF TALLY PRIME
  • COMPONENTS OF TALLY PRIME SOFTWARE
  • CREATE A COMPANY
  • SELECT COMPANY CREATED
  • SHUT A COMPANY
  • ALTER OR MODIFY COMPANY DETAILS
  • DELETE A COMPANY

MASTER CREATIONS IN TALLY PRIME

  • INVENTORY MASTERS
  • INTRODUCTION TO STOCK GROUPS
  • INTRODUCTION TO STOCK CATEGORIES
  • INTRODUCTION TO STOCK ITEMS
  • INTRODUCTION TO LOCATIONS / GODOWNS
  • UNIT CREATION

ACCOUNTING MASTERS

  • INTRODUCTION TO GROUPS
  • INTRODUCTION TO LEDGERS
  • INTRODUCTION TO VOUCHER TYPES

POSTING TRANSACTIONS USING VOUCHERS IN TALLY PRIME

  • VOUCHERS AVAILABLE IN TALLY PRIME
  • BASIC ACCOUNTING VOUCHERS
  • BASIC INVENTORY VOUCHERS
  • DISPLAYING ALL VOUCHERS IN TALLY PRIME
  • ALTERING VOUCHERS
  • DELETING VOUCHERS

ADVANCED INVENTORY & INVOICING TRANSACTIONS IN TALLY PRIME

  • ORDER PROCESSING IN TALLY PRIME
  • WORKING WITH PURCHASE ORDERS
  • WORKING WITH SALES ORDERS
  • WORKING WITH RECEIPT NOTES
  • WORKING WITH  DELIVERY NOTES
  • WORKING WITH PURCHASE INVOICES
  • WORKING WITH SALES INVOICES

WORKING WITH PRICE LIST AND PRICE LEVELS IN TALLY PRIME

  • CREATION OF PRICE LEVELS
  • CREATION OF PRICE LISTS
  • APPLYING PRICE LISTS IN TRANSACTIONS

REPORTS GENERATION IN TALLY PRIME

  • WORKING WITH BALANCESHEET
  • WORKING WITH PROFIT & LOSS A/C
  • WORKING WITH INCOME & EXPENSES REPORT INSTEAD OF PROFIT & LOSS A/C
  • WORKING WITH STOCK SUMMARY REPORT
  • WORKING WITH DAY BOOK

TAXATION- GST  UNDER TALLY PRIME 

  • INTRODUCTION TO GST
  • GST ACTIVATION
  • NATURE OF BUSINESS UNDER GST
  • BUSINESS DEALING WITH GOODS
  • BUSINESS DEALING WITH SERVICES
  • NATURE OF TRANSACTIONS UNDER GST
  • INTERSTATE TRANSACTION UNDER GST
  • INTRA STATE TRANSACTIONS UNDER GST
  • TYPE OF DEALERS
  • REGISTERED DEALERS
  • UN-REGISTERED DEALERS
  • COMPOSITE DEALERS
  • GST REPORTS

TAX DEDUCTED AT SOURCE (TDS)

IMPORTANT FEATURES IN TALLY PRIME

  • EXPORTING DATA
  • SPLIT COMPANY DATA
  • EMAIL REPORTS
  • PRINT REPORTS
  • SECURITY CONTROL
Register Online for a Certificate Course in Tally ERP 9/ Tally Prime in Goa

TallyPrime is a versatile accounting and business management software used widely in India. Let's elaborate on its features in a point-by-point manner:

TallyPrime software Feature - Student Course

Invoicing and Accounting Features:

Simplified Invoicing: TallyPrime offers a user-friendly interface for creating invoices, making it easy to bill customers and clients. You can customize your invoices with your company logo and details.

Multi-Currency Support: If your business deals with international clients or transactions, TallyPrime enables you to work with multiple currencies and manage forex gains and losses.

Accounting Ledgers: You can maintain detailed accounting ledgers to track your income, expenses, and other financial transactions. This is crucial for accurate financial reporting.

Cost Centers and Profit Centers: TallyPrime allows you to allocate expenses and revenues to specific cost centers or profit centers. This feature is essential for tracking the financial performance of different departments or projects.

Bank Reconciliation: You can easily reconcile your bank statements with your accounting records. TallyPrime helps you identify discrepancies and maintain accurate financial records.

Inventory Management Features:

Stock Management: TallyPrime offers comprehensive inventory management features. You can track stock levels, set reorder points, and generate stock status reports.

Batch and Expiry Tracking: If your business deals with products that have batch numbers or expiration dates, TallyPrime enables you to track these details, helping you manage your inventory efficiently.

Multiple Units of Measurement: You can define multiple units of measurement for your products. TallyPrime will handle conversions and help manage inventory in various units.

GST-Compliant Invoicing: TallyPrime simplifies Goods and Services Tax (GST) compliance by allowing you to create GST-compliant invoices, generate GST reports, and file GST returns easily.

Register Online For Learning TallyPrime Course in Goa India

Business Reports Features:

Financial Statements: TallyPrime generates essential financial reports like profit and loss statements, balance sheets, and cash flow statements. These reports provide insights into your business's financial health.

Real-time Data: Reports in TallyPrime are generated in real-time, ensuring that you always have access to the most up-to-date financial information for informed decision-making.

Comparison Reports: TallyPrime allows you to compare financial data across different periods, helping you identify trends and make strategic choices.

Drill-Down Capabilities: You can drill down into the details of any financial transaction or entry directly from the reports, which is invaluable for auditing and investigation.

Credit and Cashflow Management Features:

Credit Control: TallyPrime provides tools to manage your accounts receivable effectively. You can set credit limits, track pending payments, and send reminders to customers for overdue payments.

Cashflow Projections: With TallyPrime, you can forecast your cashflow and understand how your financial decisions impact your liquidity. This is crucial for managing working capital.

Credit Notes and Refunds: You can issue credit notes and refunds easily in TallyPrime, which is essential for handling returns and resolving customer disputes.

Tally ERP 9 and Prime Course Goa Institute

Taxation and Compliance Features:

GST Compliance: TallyPrime offers comprehensive support for Goods and Services Tax (GST) in India. It assists in GST registration, tax calculations, return filing, and maintaining GST-compliant records.

TDS (Tax Deducted at Source): TallyPrime can handle TDS calculations, deductions, and the generation of TDS certificates. It simplifies compliance with TDS regulations.

E-way Bills: For businesses involved in the movement of goods, TallyPrime supports the generation of e-way bills as required under GST law.

Income Tax Compliance: TallyPrime also helps in income tax compliance by generating various reports and statements required for filing income tax returns.

Audit Trail: TallyPrime maintains a detailed audit trail of all transactions, allowing you to trace back changes and ensure data integrity, which is vital for regulatory compliance.

Apply here Now to Join TallyPrime Course in Goa

Summary: 

In summary, TallyPrime is a powerful software solution for accounting, inventory management, and financial reporting. Its features help businesses streamline their operations, stay compliant with tax regulations, and make informed financial decisions. Whether you're a small business or a large corporation, TallyPrime's versatility and ease of use make it a valuable tool for managing your finances

 Check the Syllabus here

Sketchup 3D Modelling CAD Course: Introduction to Sketchup

Sketchup CAD Training Goa

DRAWING TOOLS

  • Line
  • Freehand
  • Rectangle
  • Rotate rectangle
  • Circle
  • Polygon
  • Arc
  • 2 point arc
  • 3 point arc
  • Pie

EDIT TOOLS

  • Move command
  • Rotate command
  • Scale command
  • Push/pull
  • Follow me
  • Offset

SOLID TOOLS

  • Outer shell
  • Intersect
  • Union
  • Subtract
  • Trim
  • Split

CONSTRUCTION TOOLS

  • Tape measure tool
  • Dimension
  • Protractor
  • Text
  • Axes
  • 3 D text

PRINCIPAL TOOLS

  • Select
  • Make component
  • Paint bucket
  • Eraser

CAMERA TOOLS

  • Orbit
  • Pan
  • Zoom
  • Zoom window
  • Zoom extents
  • Previous
  • Position camera
  • Look around
  • Walk

STANDARD TOOLS

  • New
  • Open
  • Save
  • Cut
  • Copy
  • Paste
  • Erase
  • Undo
  • Redo
  • Print
  • Model info

VIEWS TOOLBAR

  • Iso
  • Top
  • Front
  • Right
  • Back
  • Left

STYLES TOOL

  • X-Ray
  • Back Edges
  • Wireframe
  • Hidden lines
  • Shaded
  • Shaded with texture
  • Monochrome

SECTION TOOLS

  • Section plane
  • Display section planes
  • Display section cuts
  • Display section fill

WAREHOUSE TOOLS

  • 3D warehouse
  • Share model
  • Share component
  • Extension warehouse

SANDBOX TOOLS

  • From contours
  • From scratch
  • Smoove
  • Stamp
  • Drape
  • Add detail
  • Flip edge

VRAY TOOLBARS

  • V-Ray lights
  • Rectangle light
  • Sphere light
  • Spot light
  • IES light
  • Omni light
  • Dome light
  • Convert to mesh light
  • Light intensity tool

V-RAY FOR SKETCHUP TOOLS

  • Asset Editor
  • Render
  • Render interactive
  • Viewport render
  • Viewport render region
  • Frame Buffer
  • Batch render
  • Lock camera orientation

V-RAY OBJECTS

  • Infinite plane
  • Export Proxy
  • Import proxy or VRScene
  • Add Fur to selection
  • Convert to clipper

DYNAMIC COMPONENT

  • Interact with dynamic component
  • Component options
  • Component attributes
LAYER TOOLS
MEASUREMENTS TOOLS
CLASSIFIER TOOLS
LOCATION TOOLS
SHADOW TOOLS

Detail Syllabus for Python

Python Programming Course at Margao Goa

Introduction To Programming

The basic model of computation, algorithms, flowcharts, programming languages, compilation,
testing and debugging and documentation.

Algorithms And Flowcharts To Solve Problems

Flow chart symbols, Basic algorithms/flowchart for sequential processing, decision based
processing and interactive processing. Some example like exchanging value of two variables,
summation of a set of numbers, Decimal based to Binary base conversion, Reversing digits of
an integer, GCD (greatest common divisor) of two numbers, Test whether a number is prime,
factorial, computation, Fibonacci sequence, Evaluate 'sin x' as sum of series, Reverse order of
element of an array, find largest number in an array, Print elements of upper triangular matrixetc.

Introduction To Python

Python introduction, Technical strength of python, Introduction to python interpreter and
program execution, Using comments, Literals, Constants, python's Built in Data types, Number
(Integers, Floats, Complex Numbers, Real, Set) Strings (Slicing, Indexing, Concanation, other
operations on strings), Accepting input from console, printing statements, simple 'Python'
programs.

Operators, Expressions And Python Statements

Assignment statement, Expressions, Arithmetic, Relational, Logical, Bitwise operators and their
precedence, Conditional statement: if, if-else, if-elif-else; simple programs, Notion of interactive
computation and control flow -range function, While statement, For loop, break statement,
Continue Statement, Pass statement, else, assert.

Sequence Of Data Types

List, tuples and dictionary, (Slicing, Indexing, Concatenation, other operations on Sequence data
type) concept of mutability, Examples to include finding the maximum, minimum, mean; linear
search of the list/tuple of numbers, and count the frequency of element in a list using a dictionary.

Functions

Top-down approach of problem solving modular programming and functions, Function
parameters, Local variables, the return statement, DocStrings, global statement, Default
argument values, keyboard arguments, VarArgs parameters. Library function-input(), evolve(),
print(), String Functions: count(), find(), rfind(), capitalize(), title(), lower(), upper(), swapcase(),
islower(), isupper(), istitle(), replace (), strip (), istrip (), rstrip(), aplit(), partition(), join(), isspace(),
isalpha(), isdigit(), isalnum(), startswith(), endswith(), encode(), decode(), string: Slicing,
Membership, Pattern Matching, Numeric Functions: eval(), max(), min(), pow(), round(), int(),
random(), ceil(), floor (), sqrt(), Date & time Functions Recursion.

File Processing

Concept of Files, File opening in various modes and closing of file, Reading from a file, Writing
onto a file, File functions-open(), close(), read(), readline(), readlines(), write(), writelines(), tell
(), seek(), Command line arguments.

Scope And Modules

Scope of objects and Names, LEGB Rule, Module Basic, Module files as Namespaces, Import
model, Reloading Models.

Numpy Basics

Introduction to NumPy, ndarray, data types, array attributes, array creation routines, Array from
existing data, Array from numerical ranges, Indexing & Slicing, joining and splitting, joining of
arrays, splitting the arrays, and arithmetic operations on an Array.

Interior Design Course And Course Fees In Goa For The Year 2022

Interior Design Course fees in Goa (year 2022-2023)


Diploma In Interior Design (6 Month Duration) Fees Details

The Diploma in Interior Design Course is best Suited for Beginners, Who want to Learn the Basics of Interior Design and Concepts. The Complete Course fees of Rs 14000, can be paid in two Equal Instalment of Rs 7000 each. Please see the Details below 
 
1St Installment
  • 7000/- To Be Paid During The Time Of Admission
2nd Installment
  • 7000/- To Be Paid After 2 Months Of Admission

Diploma In Interior Design Course Fees in Goa India


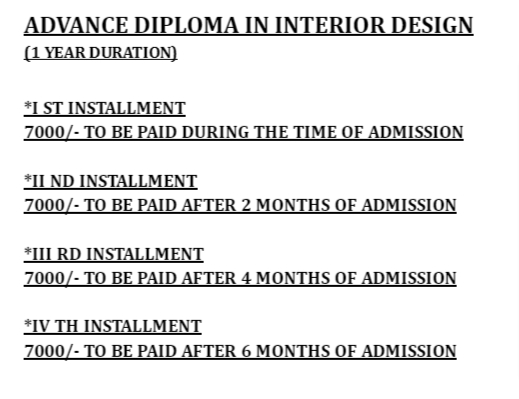
Advance Diploma In Interior Design (1 Year Duration) Fees Details:

The Advanced Diploma is Complete 1 Year Course and the Students can Pay their Course fees for in in 4 equal Instalments

1St Installment
  • 7000/- To Be Paid During The Time Of Admission
2nd Installment
  • 7000/- To Be Paid After 2 Months Of Admission
3Rd Installment
  • 7000/- To Be Paid After 4 Months Of Admission
4th Installment
  • 7000/- To Be Paid After 6 Months Of Admission
Advance Diploma In Interior Design Course Fees in Goa India

The Best Computer Courses You can Learn after 10th or 12th

With more than 20 years of Experience in Computer and related Subjects , We have faced with regular questions like : 

  • What are the Computer Courses one can Do after 12th ? or After 10th ?
  • Which Computer Courses are best for beginners? 
  • What are the Computer Courses that can get you a Job?
  • Which are the Computer Courses you Recommend for Government Job?
  • What are the Basic Computer Courses in Demand that I should Learn?
  • What are the Course Fees for the Basic Computer Courses

The Above List of Questions ate Some of Many that we are trying to Answer here. 

Read the Complete Article to get a glimpse of What type of Computer Courses are in Demand and who can do these Courses with Course fees for the Year 2021.

Who Needs to Learn About Computers ?

Computer Courses are equally great for Kids, Adults and for Seniors. 

In India , most of the busy Cities , township had one or more Computer Institutes , which educate People from all walks of Life to Lenr the Basics of Computers to the Advanced Tips and Tricks.

Now a Days Online Computer Courses are Available with the regular Classroom based Computer Training Courses.

Student Learning Computers at Institute India after 12th

As per the current Scenario , after Corona Pandemic, the use of Digital Media increases many fold. Students get Online Classroom , Office Works are distributed to workforce sitting miles aways. 

This is all possible due to the Computer Infrastructure nd Acceptance of Digital Technology. 

It Requires lots of human resources like Computer Operators, Data Entry Professionals, Content creators, Designers, Advertising Professionals, Medical Students, Doctors, Engineers, Interior Designers, Architects, Teachers, Businessman, Politicians, Bankers, Farmers, Travel Agencies, Corporates, Shopping Malls, Retail Outlets, Sports persons. Coaches, Travel Guides, Tourism Departments , Scientists, Musicians, Dance Academy , Contractors, Builders, Security Agencies, Hospitals, Clinics etc.

All needs some education based on Basics of Computers at least. 

So We think Computers are now the Integral Part of Human Society and One must have a Basic Knowledge of it , which can be achieved by Completing a Basic Computers Course .

Many Called it Diploma in Computer Application , and Some just the Basic Computer Course. Whatever be the Name , It only matters , if you can utilize your Learning in Real Life. 

So You can Learn Computers from Standard 2/ Class 2 or After 10th Class, Or after  12th Class or during the College life.

What are the Best Courses Available in India for Computer Learning ?

Honestly there are many Courses , which one can pursue to learn Computers. Most Popular Courses are

DCA (Diploma in Computers) - Check the DCA Syllabus here  (https://www.cadcamcentregoa.com/2019/04/diploma-in-computer-application-dca.html)

DTP ( Diploma in DESK-TOP PUBLICATION) Which Includes Photo Editing Courses like COREL DRAW, PHOTOSHOP and PAGE MAKER)

See DTP Syllabus here 

Accounting Computers Courses like - Certificate in Tally 

See Complete Certificate in Tally Syllabus here

Diploma in Interior Design : For Architects , Interior Designers and Can be done by Students after 12th Class. : See the Syllabus of Diploma in Interior Design here 

AutoCAD Courses : This is a great Course for many of the Students , after School and College. This Course is in Very High Demand , due to its usage, implementation in Many types of Business and Proffesions. ( Check out Who can do AutoCAD Courses ?)

Checkout the AutoCAD Course Fees (for the year 2021) here 

One can Register Online here for the AutoCAD Courses in Goa .

What is the Course fees for DCA, Tally and DTP in India ? (2021)

While the Courses and its fees are Available in Wide range of Pricing , 

We can Assure you of best Computer Courses at most Affordable and Best Prices. 

You can Checkout the Detail Course Fees List below at the CAD CAM CENTRE,Goa for the Year 2021

Computer Course Fees Goa India (DTP, DCA, TALLY) for the year 2021

CAD CAM CENTRE is Registered Under Govt. of India with Educational ISO 29990:2010 Certification.

Diploma in COMPUTER APPLICATION(DCA): Course fees is Rs. 4000 for the Classroom Training, Rs 3000 for Online Training and Rs. 500 for the Exam Fees. 

Diploma in DESK-TOP PUBLICATION(DTP)  Which Includes COREL DRAW+PHOTOSHOP+PAGE MAKER) : Course fees is in two Installments of Rs. 3000 each  for the Classroom Training as well as for Online Training and Rs.500 for the Exam Fees

Certificate in TALLY : Course fees is Rs. 4000 for the Classroom Training, Rs 3000 for Online Training and Rs. 500 for the Exam Fees.

What is the Course Fees for Diploma in interior design in India ?

At our Institute We have Two Courses on Diploma in interior design.

One is Diploma in interior design (6 month Course) and the Other is Advanced Diploma in interior design(1 year Course)

Interior Design Course Diploma India

The Course Fees for Diploma in interior design 2022 - 2023 :

1) Diploma in interior design six months course (4 months of classes and 2 months of apprenticeship ) 

  • Total course fees is 14000/- to be paid in two installments of 7000/- each.

2) Advance Diploma in interior design one year course (8 months of classes and 4 months of apprenticeship)

  • Total course fees is 28000/- to be paid in four installments of 7000/- each .

NOTE : We suggest all Doing AutoCAD Courses to engage themselves in implementing their learnings into practical use cases, like Designing a Modular Kitchen , A Apartment Design, A Office Desktop Table design, A Balcony Design etc. for your own of For someone you know. This exercise will help you in experiencing best real world scenario. 

Here are the List of Courses , we Provide to our Students , with up to date information on Course Details as well as fees.  To Join the Course One has to Register First online in the Website here, and then proceed for Admission to specific Course. These Course fees are limited to the Seat Availability 

AutoCAD Training & Courses for 2024-2025: Your Gateway to a Successful Career

As we move into the year 2024, the demand for AutoCAD Training and Courses continues to rise, especially with the shift towards online learning. More and more students are enrolling in these programs due to several key factors:

  • Affordable Course Fees: We understand that education should be accessible to all, and our AutoCAD courses are priced competitively to ensure that anyone with a passion for design can pursue their dream.
  • Expanding Job Opportunities: With the boom in the interior design and architecture sectors, especially after the global pandemic, professionals with AutoCAD skills are in high demand. The growing Indian economy in 2024-2025 is accelerating this trend, offering a wealth of opportunities for skilled designers.

Why AutoCAD is in High Demand (2024-2025)
AutoCAD has become a vital tool for interior designers, architects, and engineers, especially in the post-pandemic era. In the fast-growing economy of 2024, mastering AutoCAD will give you a competitive edge. As businesses and industries resume full-scale operations, there's an ever-increasing need for trained professionals who can keep pace with modern design requirements.

Practical Applications
To make the most out of your AutoCAD training, we encourage students to apply their learning to real-life design scenarios. For example, try designing a modular kitchen, an apartment layout, an office desk, or even a balcony. These practical projects will enhance your skills and prepare you for real-world challenges. The more you practice, the more confident and job-ready you'll become.

Courses We Offer in 2024-2025
Our AutoCAD programs are carefully curated to meet industry standards and to ensure that students receive the most up-to-date training. With detailed course content and affordable fees, we make sure you're well-prepared for a successful career.

How to Join

  • To begin your journey, you need to register online through our website. From there, you can choose the course that best fits your goals and interests.
  • Please note that course fees are linked to seat availability, so early registration is advised to secure your spot.

Don't miss out on the opportunity to build your future in design and architecture. Enroll today, and take the first step towards a fulfilling career with AutoCAD!

 
AutoCad Course Fees Chart Table with Description for Students in Goa

AutoCAD Course Fees Details :

Course Fee of AutoCAD Depends on Following Factors :

    Autocad Course Fees in Goa , India Starts At INR 2999 only
  1. Brand name of the training centre.
  2. Syllabus covered by the trainer or the institution.
  3. Years of industrial experience and knowledge of the trainer.
  4. Time duration of course or the flexibility given on time for the students.
  5. Valid certification from an AutoDesk authorized training center on completion of course.
  6. Individual with personal attention or in group training's given by the institute.
  7. Job assurance or placement if given by the institute.
  8. Infrastructure of the institution.

AutoCAD Practical Training in GOA with Course fees


AutoCAD course fees in GOA is divided into different packages depending on syllabus covered. AutoCAD Course is an Essential part of  Diploma in Civil Design Syllabus

 The Complete Course Details including the Fees in CAD Center is segregated to different Packages.
  • BASIC AutoCAD Course Fee : The Basic AutoCAD Course includes PLANS and it starts with Rs 1999/- only
  • AutoCAD 2D Course : This Course Includes AutoCAD Plans as well as 2D Designing and the Fees is Rs 2999/-
  • AutoCAD 3D Course : This Course Includes AutoCAD Models as well as 3D Designing and the Fees is Rs 2999/-
  • AutoCAD Course Fee : AutoCAD course fees which covers the entire syllabus as per Autodesk syllabus is 4999/-only,with this courses student can apply for Autodesk certified professional exam.
  • Autocad advance course fees is  5998/-which can be paid in two installments of 2999/-each.This includes creation of house models,Applying of materials using material editor,walk-through videos,render images,interior designing,making of curtain ,bed,pillow and other interiors etc in 3D. 
CAD CAM CENTRE, MARGAO. GOA (https://www.cadcamcentregoa.com)
at #11 ,M.N.F heights, Above Paulo Travels, Opp K.F.C,Near Ktc Bus Stand, Margao, Goa
Call : 09762288832 .Email : cadcamcentregoa@gmail.co
Course CodeCourse Name Description Of CourseCourse Fees
AC001Basic AutoCAD CourseThis Course Includes AutoCAD Plans₹1,999
AC002AutoCAD 2D CourseThis Course Includes AutoCAD Plans as well as 2D Designing₹2,999
AC003AutoCAD 3D CourseThis Course Includes AutoCAD Models as well as 3D Designing₹2,999
AC004Autodesk Syllabus After Completing this course, students can apply for Autodesk certified professional exam₹4,999
AC005Autocad advance courseThis includes creation of house models,Applying of materials using material editor,walk-through videos,render images,interior designing,making of curtain ,bed,pillow and other interiors etc in 3D₹5,999


Notable Points to Remember :
  • Certification charges additional.
  • All fees mentioned above is of individual training. For Group / Corporate training's Discounts you can Contact at the CAD CAM Center. Click here for Contact
The Year 2024 is a career best year for Students in Commerce and Arts. The economy is booming from Retail Sector to Manufacturing. 

Students who passed out from the School and Colleges have to Learn the best Skills that is Job guaranteed and in high Demand.

TallyPrime is one of the many best Courses that a student should Learn in India, Specially in Goa to be ready to get the most demanded Job of an Tally Accountant.

Checkout the Course Syllabus as well as Many Job Opportunities for the Year 2024, for aspiring Students. 

Best Training Institute Course to Learn Tally Prime in Goa

Complete Course Fees after 10th and 12 th in Goa


Complete Course Outline in Tally: 


Tally Prime Training Course Details

1.1 INTRODUCTION TO TALLY ERP 9
1.2 SALIENT FEATURES OF TALLY
1.3 ACCOUNTING FEATURES OF TALLY
1.4 ENHANCEMENTS IN TALLY .ERP 91.4.1 GENERAL ENHANCEMENTS
1.4.2 FUNCTIONAL ENHANCEMENTS
1.5 HARDWARE REQUIREMENT FOR TALLY 9
1.6 OPENING OF TALLY .ERP 9
1.7 COMPONENTS OF TALLY ERP 9
1.8 CREAT A COMPANY
1.9 SELECT COMPANY
1.10 SHUT A COMPANY
1.11 ALTER A COMPANY
1.12 DELETE A COMPANY

Tally ERP Course Training in Goa Institute 2. STOCK & GODOWN

2.1 INTRODUCTION TO STOCK GROUP
2.1.1 CREATING A SINGLE STOCK GROUP
2.1.2 DISPLAYING SINGLE STOCK GROUP
2.1.3 DISPLAYING MULTIPLE STOCK GROUP
2.1.4 ALTERING A SINGLE STOCK GROUP
2.1.5 ALTERING MULTIPLE STOCK GROUP
2.2 INTRODUCTION TO STOCK CATEGORIES
2.2.1 ENABLING STOCK CATEGORIES
2.2.2 CREATING A SINGLE STOCK CATEGORIES
2.2.3 CREATING MULTIPLE STOCK CATEGORIES
2.2.4 DISPLAYING A SINGLE STOCK CATEGORIES
2.2.5 DISPLAYING A MULTIPLE STOCK CATEGORIES
2.2.6 ALTERING A SINGLE STOCK CATEGORIES
2.2.7 ALTERING A MULTIPLE STOCK CATEGORIES
2.3 INTRODUCTION TO STOCK ITEM
2.3.1 CREATING A SINGLE STOCK ITEN
2.3.2 CREATING MULTIPLE STOCK ITEM
2.3.3 DISPLAYING A SINGLE STOCK ITEM
2.3.4 DISPLAYING A MULTIPLE STOCK ITEM
2.3.5 ALTERING A SINGLE STOCK ITEM
2.3.6 ALTERING A MULTIPLE STOCK ITEM
2.4 UNIT OF MEASUREMENT
2.4.1 CREATING SINGLE UNIT OF MEASUREMENT
2.4.2 CREATING COMPOUND UNITS OF MEASUREMENTS
2.4.3 DISPLAYING A UNITS OF MEASUREMENTS
2.4.4 ALTERING A UNIT OF MEASUREMENTS
2.5 INTRODUCTION TO GODOWNS
2.5.1 CREATING A SINGLE GODOWN (NORMAL MODE)
2.5.2 CREATING A SINGLE SODOWN (ADVANCE MODE)
2.5.3 CREATING MULTIPLE GODOWNS
2.5.4 DISPLAYING STOCK GODOWNS
2.5.5 ALTERING STOCK GODOWN

3. GROUP, LEDGER, VOUCHER, ORDER, INVOICE

3.1 INTRODUCTION TO GROUPS
3.1.1 CREATING A GROUP
3.1.1.1 CREATING A SINGLE GROUP
3.1.1.2 CREATING MULTIPLE GROUP
3.1.2 DISPLAYING A GROUP
3.1.2.1 DISPLAYING A SINGLE GROUP
3.1.2.2 DISPLAYING MULTIPLE GROUP
3.1.3 ALTERING GROUPS
3.1.3.1 ALTERING A SINGLE GROUP
3.1.3.2 ALTERING A MULTIPLE GROUP
3.1.3.3 DELETING A GROUP
3.2 INTRODUCTION TO LEDGERS
3.2.1 CREATING A LEDGER
3.2.1.1 CREATING A SINGLE LEDGER
3.2.1.2 CREATING A MULTIPLE LEDGER
3.2.2 DISPLAYING /ALTERNATING A LADGER CCOUNT
3.2.3 DELECTION OF A LEDGER ACCOUNT
3.3 INTRODUCTION TO VOUCHER TYPE
3.3.1 CREATING A VOUCHER TYPE
3.3.2 DISPLAYING AVOUCHER TYPE
3.3.3 ALTERNATING A VOUCHER TYPE
3.3.4 CREATING ACCOUNTING VOUCHER
3.3.5 CREATING AN INVENTORY VOUCHER
3.4 INTRODUCTION TO PURCHASE ORDERS
3.4.1 ELABLING ORDER PROCESSING
3.4.2 CREATING A PURCHASE ORDER
3.4.3 ALTERNATING A PURCHASE ODER
3.4.4 DELECTING A PURCHASE ORDER
3.5 INTRODUCTION TO SALES ORDERS
3.5.1 CREATING A SALES ORDER
3.5.2 ALTERNATING A SALES ORDER
3.5.3 DELECTING A SALSE ORDER
3.6 INTRODUCTION TO INVOICES
3.6.1 ELABLE ALLOW INVOICING? OPTION
3.6.2 CREATING AN INVOICE ENTRY
3.6.3 SETTING INVOICE / ORDERS ENTRY
3.6.4 CONFIGURE INVOICE PRINTING
3.6.5 PRINTING INVOICE / VOUCHER

4. REPORTS IN THE TALLY.ERP 9

4.1 BASIC FEATURES OF DISPLAYING REPORTS
4.2 WORKING WITH BALANCE SHEET
4.2.1 SCHEDULE VI BALANCE SHEET
4.2.2 BUTTON OPTION IN SECDULE VI BALANCE SHEET
4.2.3 CONFIGURING THE BALANCE SHEET
4.2.4 ADDING A NEW COLUMN IN A BALANCE SHEET
4.2.5 ALTERNATING FROM A COLUMN IN A BALANCE SHEET
4.2.6 DELECTING A COLUMN FROM A BALANCE SHEET
4.2.7 DISPLYING A HALF YEARLY BALANCE SHEET
4.3 WORKING WITH PROFIT & LOSS ACCOUNT
4.3.2 SCHEDULE VI PROFIT & LOSS ACCOUNT
4.3.2 BUTTON OPTION IN SECDULE VI PROFIT & LOSS ACCOUNT
4.3.3 CONFIGURING PROFIT & LOSS ACCOUNT
4.3.4 ADDING A NEW COLUMN IN A PROFIT & LOSS ACCOUNT
4.3.5 ALTERNATING A COLUMN FROM A BALANCE SHEET
4.3.6 DELECTING A COLUMN FROM A BALANCE SHEET
4.4 INCOME/EXPENSE STATEMENT INSTEND OF P&L?
4.5 WORKING WITH STOCKS SUMMARY REPORT
4.5.1 CONFIGURATION IN TRIAL BALANCE
4.6 WORKING WITH RATIO ANALYSIS
4.7 WORKING WITH TRIAL BALANCE
4.7.1 F12: CONFIGURATION IN TRIAL BALANCE
4.8 WORKING WITH DAY BOOK
4.8.1 DISPLAYING A DAY BOOK REPORT FOR A PARTICULAR VOUCHER
4.8.2 DISPLAYING THE DAY BOOK IN DETAILED VIEW
4.8.3 CONFUGRATION OF DAY BOOK REPORT

5. PAYROLL IN TALLY.ERP 9

5.1 INTRODUCTION TO PAYROLL
5.1.1 FEATURE OF TALLY ERP 9 PAYROLL
5.1.2 ENABLING PAYROLL IN TALLY. ERP 9
5.2 INTRODUCTION TO EMPLOYEE CATEGORIES
5.2.1 CREATEING SINGLE EMPLOYEE CATEGORIES
5.2.2 CREATEING MULTIPLE EMPLOYEE CATEGORIES
5.3 INTRODUCTION TO EMPLOYEE GROUPS
5.3.1 CREATEING SINGLE EMPLOYEE GROUPS
5.2.2 CREATEING MULTIPLE EMPLOYEE GROUPS
5.4 INTRODUCTION TO EMPLOYEES
5.4.1 CREATEING SINGLE EMPLOYEE
5.4.2 CREATEING MULTIPLE EMPLOYE
5.5 INTRODUCTION TO PAYROLL UNIT
5.5.1 CREATEING PAYROLL SINGLE UNIT
5.5.2 CREATEING PAYROLL COMPOUND UNIT
5.6 INTRODUCTION TO ATTENDENCE / PRODUCTION TYPES
5.6.1 CREATEING ATTENDANCE TYPE
5.6.2 CREATEING PRODUCTION TYPE
5.6.3 CREATING USER DEFINED CALENDAR TYPES
5.7 INTRODUCTION TO PAY HEADS
5.7.1 PAY HEAD TYPES
5.7.2 CREATING A PAY HEAD
5.8 PAYROLL VOUCHER ENTRY/ TRANSACTIONS
5.8.1 CREATEING ATTENDANCE / PRODUCTION VOUCHER
5.8.1.1 ATTENDENCE VOUCHER – MANUAL ENTRY
5.8.1.2 ATTENDENCE VOUCHER USING AUTO AUTO FILL
5.8.2 CREATEING PAYROLL VOUCHERS
5.8.2.1 USER DEFINED PAY HEAD PROCESS
5.8.2.2 SALARY PROCESS
5.8.2.3 PF PROCESS
5.8.2.4 ESI PROCESS
5.8.2.5 EMPLOYER PF ADMIN CHANGES PROCESSING
5.9 INTRODUCTION PAYROLL REPOTRS
5.9.1 STATEMENTS OF PAYROLL
5.9.1.1 PAY SLIP
5.9.1.2 PAY SHEET
5.9.1.3 PAYROLL STATEMENT
5.9.2 ATTENDANCE REPORTS
5.9.2.1 ATTENDANCE SHEET
5.932.2 ATTENDANCE REGISTER
5.9.3 EXPAT REPORTS
5.9.3.1 PASSPORT EXPIRY REPORT
5.9.3.3 CONTRACTEXPRIY REPOTS
5.9.4 PAYROLL STATUTORY REPORTS

6.TAXATION

6.1 INTRODUCTION TO SERVICE TAX
6.1.1 SERVICE TAX FEATURES IN TALLY.ERP9
6.1.2 ENABLING SERVICE TAX IN TALLY.ERP9
6.1.3 CREATING A SERVICE PURCHASE LEDGER
6.1.4 CREATING A SERVICE SALES LEDGER
6.1.5 CREATING A SERVICE PROVIDER (SUPPLIER) LEDGER
6.1.6 CREATING A SERVICE RECEIVER (CUSTOMER) LEDGER
6.1.7 SERVICE TAX REPORTS
6.2 TAX COLLECTED AT SOURCE (TCS)
6.2.1 FEATURES OF TCS IN TALLY.ERP 9
6.2.2 ENABLING TCS IN TALLY.ERP 9
6.2.4 CREATING SALES LEDGER AND OUTPUT VAT LEDGER
6.2.5 CREATING TCS LEADGER
6.2.6 CREATING A STOCK ITEM
6.2.7 TCS REPORTS
6.3 TAX DEDUCTED AT SOURCE (TDS)
6.3.2 CREATING A EXPENSE LEDGER
6.3.3 CREATING A PARTY LEDGER
6.3.4 CREATING A TAX LEDGER
6.3.5 TDS REPORTS
6.4 VALUE ADDED TAX (VAT)
6.4.1 VAT IN INDIA
6.4.2 GENERAL TERMINOLOGIES OF VAT
6.4.3 ENABLING REGULAR VAT IN TALLY.ERP 9
6.4.4 ENABLING COMPOSITE VAT IN TALLY.ERP 9
6.5 GOEODS AND SERVICE TAX (GTS)
6.5.1 ACTIVATING GST FOR YOUR COMPANY
6.5.2 DEACTIVATING VAT, EXCISE SND SERVICE TAX FEATURES
6.5.3 SETTING UP GST RATES
6.5.4 CREATING PURCHASE AND SALES LEDGER
6.5.5 CREATING A TAX LEDGER
6.5.6 REATING A EXPENSE LEDGER
6.5.7 CREATING A PARTY LEDGER
6.5.8 CREATING A STOCK ITEM
6.5.9 CREATING A PURCHES VOUCHER
6.5.10 CREATING A EXTEMPT PERCHES VOUCHER
6.5.11 CREATING A SALES VOUCHER
6.5.12 GST REPORTS

7. INTRODUCTION TO TALLY. NET

7.1 INTRODUCTION TO TALLY.NET
7.2 TALLY.NET FEATURES
7.3 CONFIGURE & CONNECT TO TALLY. NET
7.4 CREATE TALLY.NET USERS
7.5 REMOTE LOGIN
7.6 CREATE SECURITY CONTROLS FOR TALLY.NET USERS
7.7 AUTHORISE TALLY.NET USERS

8. IMPORTANT FEATURES OF TALLY. ERP 9

8.1 TALLY.ERP 9 FEATURES
8.2 BACKUP IN TALLY ERP 9
8.3 RESTIRING BACKUP
8.4 SPLIT COMPANY DATA
8.5 VERIFY SPLIT DATA
8.6 EXPORTING DATA
8.7 EXPORTING FORMATES
8.8 EXPORTING DATA FORM MASTER
8.9 IMPORTING DATA
8.10 IMPORTING FORMATS
8.11 IMPORTING MASTERS
8.12 IMPORTING VOUCHERS
8.13 E-MAIL REPORT
8.14 SECURITY CONTROL IN TALLY ERP 9
8.15 ENABLE SECURITY CONTROL FOR A COMPANY ( ADMINISTRATOR LOGIN)
8.16 DISABLE SECURITY CONTROL
8.17 CREATE SECURITY LEVELS

9. SHORTCUT KEYS OF TALLY.ERP 9

9.1 FUNCTION KEY COMBINATION
9.2 SPECIAL KEY COMBINATION
9.3 SPECIAL FUNCTION KEY COMBINATION
9.4 KEY COMBINATION USED FOR NAVIGATION

DIPLOMA IN COMPUTER APPLICATION(DCA) 6 MONTHS

DCA Computer Training Course in Goa Institute
Part I:  MS Word
Chapter 1: Word, a Word Processor
4.1 Welcome to Microsoft Office
4.2 Welcome to Word
4.3 Our First Document
4.4 Saving a Document
4.5 Creating a new Document
4.6 Creating a backup Copy
4.7 Dialog Box Save As Revisited
4.8 Shutting Down Word
4.9 Opening a Existing Document
4.10 Creating Templates
4.11 Handling Multiple Documents
4.12 Various Views
4.13 Home-Pane
4.13.1 Clipboard-Group
4.13.2 Front-Group
4.13.3 Paragraph- Group
4.13.4 Styles-Group
4.13.5 Editing Group
4.14 Getting Help
4.15 Preparing a Suitable Document
4.16 Dialog Box Word options and Auto Corrections
4.17 Spelling and Grammar Corrections
4.18 Navigating Keyboard Cursor
4.19 Selecting Text
4.20 Formatting Text
4.21 Setting Font and Font size Using Home-Pane
4.22 Using Bold, Italic and Underline tools
4.23 Using the Dialog Box Front
4.24 Character level and Paragraph level Formatting

Chapter 2: Mastering Word

5.1 Live Preview
5.2 Customizing Quick Access Toolbar
5.3 Bullets and Numbering
5.4 Creating a Table: User-Default Tab Setting
5.5 Creating a Table: User Defined Tab Setting
5.5.1 Using the Tab Selection –Bottom
5.5.2 Setting Tab Stops and Typing Data for Table
5.6 Using the Dialog Box Tabs
5.7 Cut, Copy and Past
5.8 Zooming in and zooming out
5.9 Subscripts and Superscripts
5.10 Inserting Symbols
5.11 Status Bar
5.12 Inserting and Removing Page Numbers
5.13 Drop Cap
5.14 Using Hyphenation
5.15 Seating a page
5.16 Paragraph Formatting
5.16.1 Alignments and Indentation Using the Tools
5.16.2 Line Spacing
5.16.3 Spacing Between paragraph
5.16.4 Indentation Using the Dialog Box paragraph
5.16.5 Formatting Complete Document
5.17 Adding Footnotes and Endnotes
5.18 Adding and Deleting Header and Footer
5.19 Be Stylish
5.20 Printing a Document
5.21 Remote Printing without Using Print files
5.22 Remote Printing Using Print Files
5.23 Welcome to word
5.23.1 Opening Screen of word
5.23.2 Our first Document and Knowing the Task-panes
5.23.3 Savings a Document
5.23.4 Creating a New Documents
5.23.5 Standers tools Bars and Formatting Toolbar
5.23.6 Creating Backup Copy
5.23.7 Shutting Down Word
5.23.8 Opening and Exiting Document
5.23.9 Nuts and Bolts of word
5.23.10 Getting help
5.23.11 changing the face office Assistant

Part II: MS Excel

Chapter 3: Excel a Spreadsheet Application

6.1 Welcome to Excel
6.2 Creating a First Workbook
6.2.1 Opening Screen of Excel
6.2.2 Component of Workbook
6.2.3 Typing data in a Worksheet
6.2.4 Edition Data and formula- Bar
6.2.5 Saving a Workbook
6.2.6 Creating a Backup Copy
6.2.7 Shutting Down Excel
6.3 Home Page
6.3.1 Clipboard- Group
6.3.2 Front –Group
6.3.3 Alignment-Group
6.3.4 Number-Group
6.3.5 Styles- Group
6.3.6 Cells- Group
6.3.7 Editing-Group
6.4 Navigating Selector
6.5 Creating a new Workbook
6.6 Opening and Existing Workbook
6.7 Selecting Multiple Workbook
6.8 AutoFill
6.9 Getting Help
6.10 Handling Multiple Workbook
6.11 Working with Worksheet
6.11.1 Renaming a Worksheet
6.11.2 Inserting a new Worksheet
6.11.3 Deleting a Worksheet
6.11.4 Moving or Coping Worksheet
6.11.5 Using Sheet-Tab-Scroll-Buttons and Tab-Split box
6.12 Cut, copy and Paste
6.13 Resizing Rows and Column
6.14 Installed Templates

Chapter 4: More Adventure with Excel

7.1 Entering Test, Numbers, and Dates
7.2 Inserting and Removing Cells, Rows, and Column
7.2.1 Inserting and Removing Cells, Rows, and Column
7.2.2 Deleting Cells, Rows, and Columns
7.3 Merging Cells
7.4 Formatting Sells and Tables
7.5 Creating Charts
7.6 Using Formulae
7.6.1 Typing a Formula in a cell
7.6.2 Entering a Formula in cell Using Copy and Paste Method
7.6.3 Entering a Formula in a cell Using AutoFill
7.6.4 How to Edit a Formula
7.6.5 How to Create a Formula
7.6.6 Relative Addressing and Absolute Addressing
7.6.7 Coping Values Instead of Formula
7.7 Using Functions
7.8 Printing Small Worksheet
7.9 Printing Large Worksheet
7.10 Creating a Database
7.11 Welcome to Excel
7.11.1 Creating a First Workbook
7.11.2 Editing Data and Formula-Bar
7.11.3 Saving and Workbook
7.11.4 Creating a Backup Copy
7.11.5 Shutting Down Excel
7.11.6 Standard toolbar and Formatting Toolbar
7.11.7 Creating a new Workbook
7.11.8 Opening and Existing Workbook
7.11.9 Nuts and Bolts of Excel

Part II: MS PowerPoint

Chapter 5: PowerPoint a Presentation Application

9.1 Welcome to PowerPoint
9.2 Opening Screen of PowerPoint
9.3 Creating a Presentation Using a Templates
9.4 Saving a Presentation
9.5 Slide Show at Home
9.6 Using View Buttons
9.7 Slide Show at Seminar Side
9.8 Opening and Existing Presentation
9.9 Creating a Presentation Using word Documents
9.10 Using Home-Pane
9.11 Adding Design to a Presentation
9.12 Adding Animation to a Presentation
9.13 Adding Sound to a Presentation
9.14 Working with Sides
9.14.1 Adding a New Sides
9.14.2 Deleting a Sides
9.14.3 Placing a Text Box on a Sides
9.14.4 Placing a Picture on a Sides
9.14.5 Placing a Clip Art on a Side
9.14.6 Placing a Video Clip on a Sides
9.15 Creating a Presentation from Scratch
9.15.1 Opening a Blank Presentation
9.15.2 Adding Footer to a Slide
9.15.3 Developing a Presentation
9.16 Welcome to PowerPoint
9.16.1 Opening Screen of PowerPoint
9.16.2 Multiple ways Of Creating Presentation
9.16.3 Creating a Presentation Using word Documents
9.16.4 Saving a Presentation
9.16.5 Using Design Temple
9.16.6 Slide Show
9.16.7 Shutting Down PowerPoint
9.16.8 Opening and Existing Presentation
9.16.9 Nuts and Bolts of PowerPoint

DIPLOMA IN DESKTOP PUBLICATION (DTP) 6 MONTH

Desktop Publishing DTP Course Training in Goa Institute

Chapter 1: Welcome to Desktop Publishing

Part I – Introduction

Why Learn Desktop Publishing (DTP)?
What is DTP?
Letterpress Printing
Wooden Types and Metal Types
Hot Metal Types
Printing Photographs
Lithography and Offset Printing
Gravure
Hardware Requirement
Software Requirement
DTP Operators Arsenal
1.1.8 Text Editors
1.8.2 Word Processors
1.8.3 Vector Illustration Applications or Drawing Applications
1.8.4 Bitmap Image Editing Application
1.8.5 Page Layout Applications
1.9 Scanning
1.10 Printing
1.11 Monitor
1.12 Input and Output Device, and Storage
1.13 Vector Graphics and Raster Graphics
1.14 Fronts
1.14.1 Front Styles
1.14.2 Serif and Sans Serifs
1.14.3 Dimension of Front
1.14.4 Fixed Pitch Front and Proportional Spaced Front
1.14.5 Scaling, Tracking, Kerning, Leading and Ligatures
1.14.6 Fronts in your computer
1.14.7 Vectors Fronts (or outline fronts) and Bitmapped Fronts
1.15 Character level and paragraph level Formatting
1.16 Drop Caps
1.17 Hyphenation
1.18 Alignments
1.19 Indentation
1.20 Single sided and double sided Documents
1.21 Headers and Footers
1.22 Footnotes and Endnotes
1.23 Using the Mouse
1.24 Using the keyboard
1.25 Selecting the Text and Graphics
1.26 Cut, copy, paste and clipboard
1.27 Graphics File Formats
1.28 Half-tone Image
1.29 Screen colors (RGB) and Printer colors (CMYK)
1.30 Sports colors and process colors
1.31 colors separation
1.32 coleus half –tone Image
1.33 Generic process in Desktop publishing

Part II: CorelDraw 10

Chapter 2: The Fascinating CorelDraw 10

2.1 Welcome to CorelDraw 10
2.1.1 Starting CorelDraw 10
2.1.2 Creating the very fast Drawing
2.1.3 Saving the Drawing
2.1.4 Closing the Drawing and shutting Down CorelDraw 10
2.2 Opening and Exiting Drawing
2.3 The dialog Box Open Drawing
2.4 Status Bar
2.5 Cartesian Coordinates
2.6 The property Bar
2.7 Creating a Text File
2.8 Basic Terms
2.9 The toolbox
2.10 Page and Pasteboard

Chapter 3: Adventures with CorelDraw 10

3.1 Standard Tool Bar
3.2 Handling Shapes using the property Bar
3.3 Rotating Objects
3.4 Lines and Arrows
3.5 Page and Document Setup
3.6 Rulers, Guidelines and grid
3.7 Using Dockers window
3.8 Using Test
3.8.1 Artistic Test
3.8.2 Paragraph Test
3.8.3 Formatting Text
3.9 Using Help
3.10 Printing a Drawing
3.11 Arrangement of Objects
3.12 Using the Library of Clip Arts and Bitmap Image
3.13 Fun with the Artistic Media Tool
Part III: Color Plates

Part IV: Photoshop 7

Chapter 4: The Exciting Photoshop 7

4.1 Welcome to Photoshop 7
4.2 Opening an Image
4.3 Saving an Image
4.4 Closing an Image and Shutting Down Photoshop
4.5 Creating a new Image
4.6 Using the toolbox
4.7 Tool Options Bar

Chapter 5: More fun with Photoshop 7

5.1 Using Layers
5.1.1 The Layers Palette
5.1.2 Adding a new Layer
5.1.3 Hiding a Layer
5.1.4 Renaming a Layer
5.1.5 Removing or deleting a layer
5.1.6 Merging Layers
5.1.7 Copy and Paste with Image
5.1.8 Flattening the Image
5.2 Seeking Help
5.3 Paths for saving Selection
5.4 Fascinating Colors
5.4.1 Various Colors model
5.4.2 The Colors Pickers
5.4.3 The Colors Palette
5.4.4 The Colors Swatches Palette
5.4.5 ICC (inter- Color Consortium)
5.5 Inserting Test and Image
5.6 Printing Image
5.7 Filters to Improve the Image

Part V: PageMaker 7

Chapter 6: The Marvelous Page Maker 7

6.1 Why PageMaker?
6.2 Creating a new publication in PageMaker 7
6.2.1 Starting PageMaker 7
6.2.2 The dialog Boxes Document Setup and save Publication
6.2.3 Closing the publication and Shutting PageMaker
6.3 The Dialog Box Open Publication
6.4 Text Blocks
6.4.1 Drawing a Text Block by dragging the mouse-cursor
6.4.2 Empty Test Blocks are Deleted Automatically
6.4.3 Creating a Test Block by a Mouse click
6.4.4 Fitting Test Blocks on a page
6.4.5 Inserting Pages While Placing Test
6.5 Handling Pages
6.5.1 Inserting Page
6.5.2 Deleting Page
6.5.3 Go to the desired page
6.6 Flow of Text in linked Text Blocks
6.7 Using the Toolbox

Chapter 7: The Power of PageMaker 7 Unleashed

7.1 Using the Tool Bar
7.2 Importing Text
7.3 Manual Semi-automatic and Automatic Test Flow
7.4 Importing Picture
7.5 Wrapping Text around pictures
7.6 Character Level Formatting
7.7 Paragraph Level Formatting
7.8 Opening Multiple Publication Windows
7.9 Using Story Editors
7.9.1 Editing and Existing Story
7.9.2 Creating a new Story
7.9.3 Using Story Editor Effectively
7.10 Spelling, Find, and Change
7.10.1 Checking Spelling
7.11.1 Dialog Boxes Find Change
7.11 View, Page, and Pasteboard
7.12 Grouping and Arranging
7.13 Using Styles
7.13.1 Using the Predefined Styles
7.13.1 Creating a new Style
7.13.2 Using Styles Effectively
7.14 Using the Document master pages
7.14.1 Why Use Master Page
7.14.2 Numbering Pages
7.15.3 Creating the Sample Publication Nature
7.15 Sample Publication
7.16 Printing and Color Separation

Chapter 8: A quick tours of QuarkXPress, MS Publisher, Corel VENTURA, and Adobe Illustrator

8.1 A Quick Tour of QuarkXPress 4.0
8.1.1 Creating a new Document
8.1.2 Saving a Document and Creating a Template
8.1.3 Closing and Opening a Document Shutting QuarkXPress
8.1.4 Using the Tools Platte
8.1.5 Creating and Linking Text Boxes
8.1.6 Importing Text
8.1.7 Importing Pictures
8.1.8 Resizing and Relocating Boxes
8.1.9 Formatting Text
8.2 Quick Tour of MS Publisher 2000
8.3 Quick Tour of Corel VANTURA 5.0
8.4 Quick Tour of Adobe Illustrator 9.0
8.5 Generic Tips for DTP Professional